Tuesday, August 09, 2011

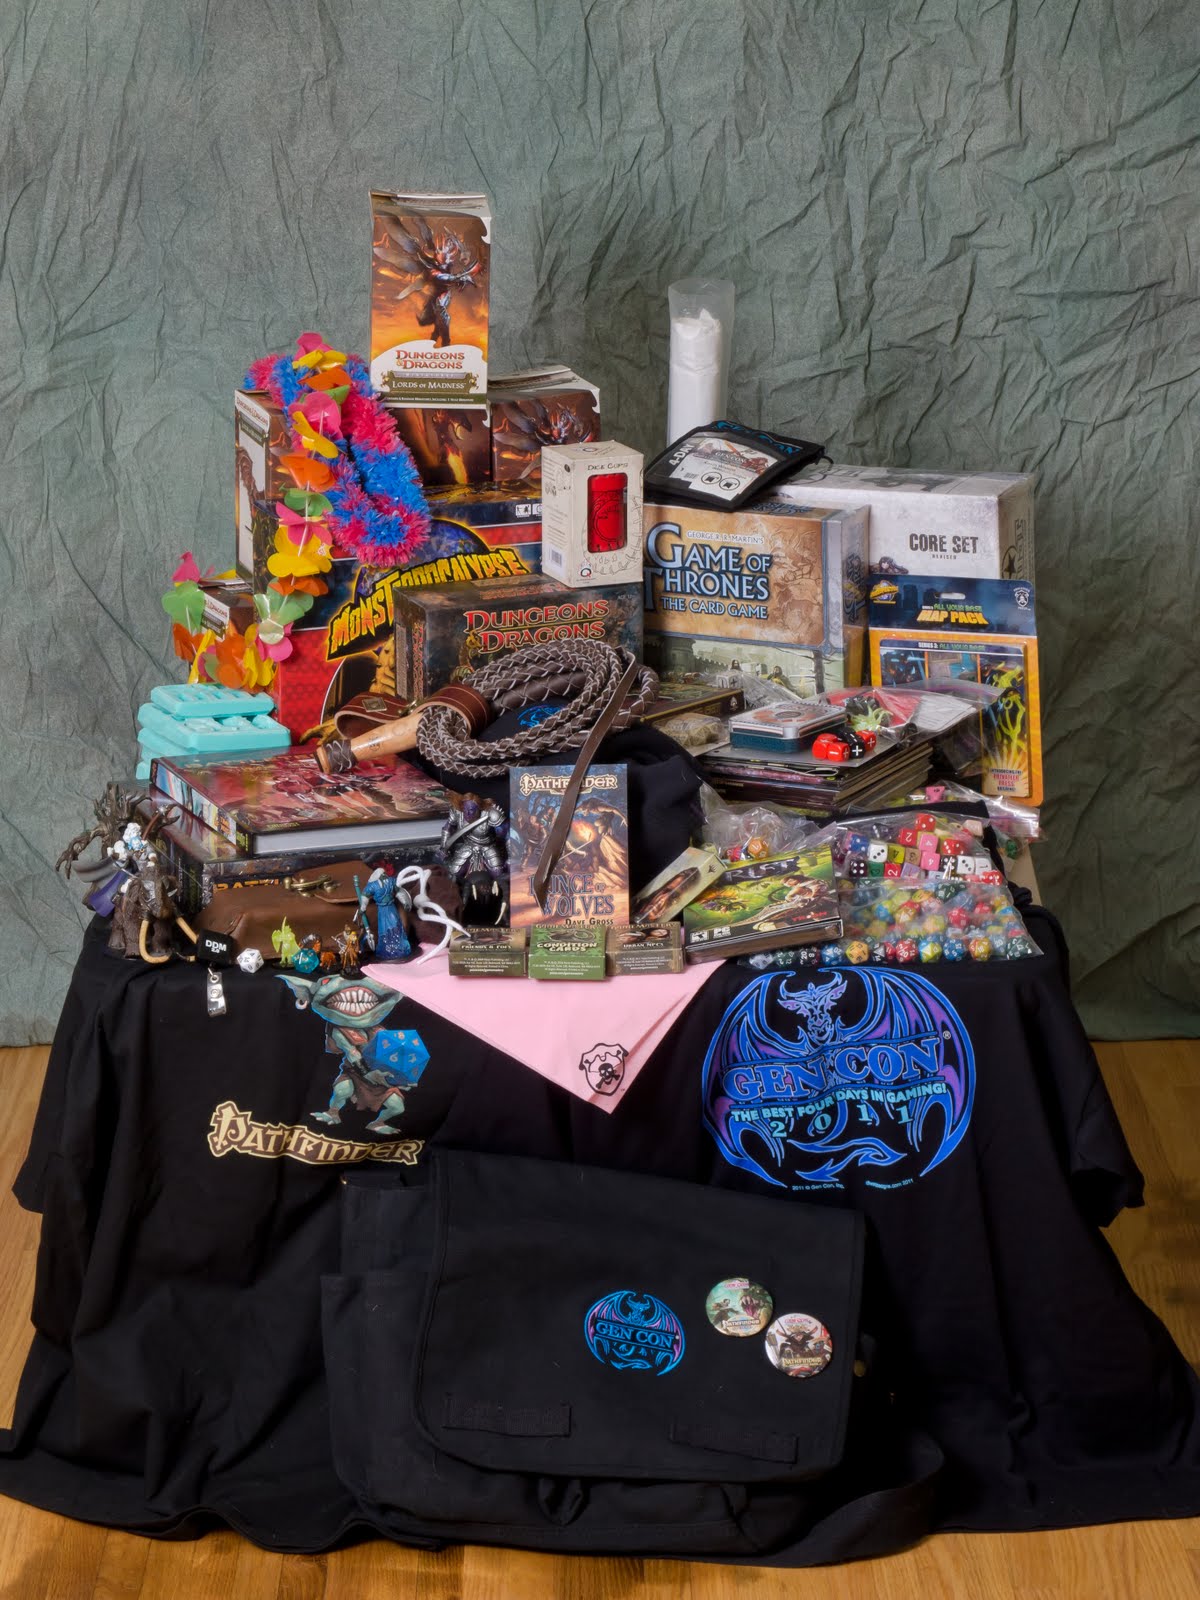
GenCon 2011: Pile of Awesome


As you can see by our awesome pile of loot, we totally Greyhawk'ed GenCon this year. Yeah, we went a little overboard, but it was just too much fun.


(photo from blondeswan.com)

Some of the best stuff isn't pictured though, including Desi's new leather corset, her fancy new steampunk hat (purple suede with feathers) on order, my red suede fez hat with gold tassel on order, her super-fancy steam punk pocket watch, and a Randovan character Pathfinder metal miniature I got free at the Paizo booth. Oh! And the two minis Desi and I got in the Paint & Take event.


The lady above bought this hat out from under Desi. I found her wandering around the exhibit hall the next day, and I talked to her. I told her about Desi and she told me she'd seen the hat the day before she bought it and initially passed it up because of the price. Then the next day she said to herself, "Screw it, I'm on vacation," and bought her whole outfit. So Desi had to order it. Desi's hat is also from the Blonde Swan.

List of Loot from the Pile of Awesome 2011
1.) Case of Lords of Madness D&D minis (8 boxes)
2.) D&D Beholder collector set
3.) DUST Tactics Core Set (game)
4.) A Game of Thrones Card Game
5.) Lays (2): free at FUDGE game*
6.) Chessex clear vinyl map matt 23x25" w/ 1" grid
7.) Chessex clear vinyl map matt 35x46" w 1" hex **
8.) Q-Workshop dice cup, red leather w/ dragon
9.) Six Castle Molds molds: #164, #84, #64, #87, #66, #83
10.) Leather bullwhip with belt holster
11.) Large hard leather clip-on belt pouch
12.) Battletech RPG core rule book
13.) Battletech introductory box set
14.) Q-Workshop red Celtic dice set
15.) Q-Workshop Pathfinder Chronicles Rise of the Runelords dice set
16.) Q-Workshop fudge dice, two sets, white and black
17.) Q-Workshop steam punk d20 and d6
18.) FUDGE dice, two sets, red and black
19.) Monsterpocalypse (game)
20.) Monsterpocalypse map pack
21.) Random pitcher full of dice w/ yield of 427 dice (breakdown below)
22.) Random cup full of dice w/ yield of 62 dice (breakdown below)
23.) Assorted individual D&D minis (breakdown below)
24.) Privateer Press bandannas, two black, two pink
25.) DDM guild mini boosters for Kevin and Desi (breakdown below)
26.) DDM guild minis from wins: Astral Giant, Giant Centede
27.) Assorted Paizo game books and accessories (breakdown below)
28.) Paizo subscription books I picked up at GenCon (breakdown below)
29.) GenCon 2011 messenger bag
30.) GenCon 2011 blue dragon T-shirt
31.) GenCon 2011 release your inner gamer T-shirt
32.) GenCon 2011 sweat jacket
33.) GenCon 2011 commemorative dice set
34.) Paizo goblin T-shirt
35.) Prince of Wolves Pathfinder Tales novel I won at Pathfinder Society
36.) Cathedral flip mat Desi won at Pathfinder Society
37.) Song of Ice and Fire RPG GM screen
38.) Paranoia: Internal Security, Flashbacks Redux, module***
36.) Rift game from shwag
37.) Magic cards pack from shwag

* I played Mouth of Milu FUDGE module this year and it was a Hawaii themed adventure. The GM had the table decked out as a Tiki bar. Was sweet!

** Disappointed because this one was supposed to be clear. Have emailed Chessex to see if I can get the real deal. UPDATE: Their response: "What's your address. I'll ship you one." Sweet!

*** A Funny Thing Happened on the Way to the Termination Booth

Random pitcher full of dice:
115 d20
102 d6
68 d8
88 d10 (18 d100)
19 d12
35 d4

Random coffee cup full of dice:
16 d20
15 d6
6 d4
5 d8
2 d12
18 d10 (4 d100)

Assorted individual minis:
Cloud Giant
Eldrich Giant
Fiendish Spider
Tundra Scout
Treant

Assorted Paizo game books and accessories:
Area of Effect Templates Miniatures Skirmish Package
Princes of Darkness
Seekers of Secrets
Friends & Foes face cards
Urban NPC's face cards

Paizo subscription books I picked up at GenCon:
Pathfinder Society Field Guide
Goblins of Golarion
Inner Sea Magic
AP #48: Carrion Crown, Shadows of Gallowspire
AP #49: Jade Regent, The Brinewall Legacy
Ultimate Combat (signed!)

Kevin's DDM Booster:
Dutybound Paladin
Stealth Mage
Master Shadowdancer
Human Fighter Lord
Mire Hound
(white d20 and line of sight extender)

Desi's DDM Booster:
Ragnara, Ethereal Hunter
Warforged Juggernaut
High Cleric of Sune
Rot Grub Swarm
Banshee
(white d20 and line of sight extender)

 - Posted using BlogPress from my iPad

Wednesday, August 03, 2011

"Hains" Prusa Mendel RepRap: Printing!


On schedule, the machine is now printing. The first attempt, as you'll see, wasn't perfect. It was, however, much better than anticipated. I'd been told that especially because of my nozzle selection, starting to print would be particularly difficult. But it worked. In the video I sound somewhat less enthusiastic than the results ultimately warranted, but I really was quite proud of the outcome.


Blue tape goes on to the print bed. Then I put some kind of catch for the leaking plastic, usually I use newspaper, while I heat the nozzle. I clear the nozzle of plastic and load the file into the printer host, called Pronterface. When I hit "print" the nozzle goes to "home" on all three axis, and then moves to the print area. There it goes through its routine until finished, at which point the nozzle is retracted a little bit. I then have to move the Y axis back to home and move the nozzle up a little more.


Peel the part off the blue tape, and there you have it. Looks like hell, but as first prints go it is actually very good, I'm told. It's supposed to be a mustache ring. It's called the Movember Ring and I downloaded it from Thingiverse to be printed on my machine. It's supposed to be a good calibration print because it has something round for judging geometry and something detailed to determine resolution.


Last night I succeeded at recalibrating the machine to produce some better results and changed over to a more simple object, a 1cm high and 2cm around cylinder. The first attempt was somewhat successful (pictured above), but a second try with a little tweak to get the nozzle up off the bed a little before printing started, that helped a lot and I got my best print yet (pictured at top.)


I've started live-streaming much of the activity with the RepRap. You can sometimes catch me live at my UStream channel. You can also follow me on Twitter and I post there when I'm about to start.

So three cheers. I'm printing! Soon I'll have it dialed in and will start printing parts for a child machine (i.e., another machine made by the first.)

But tomorrow I go to GenCon! Next few blog posts will be about that.

Saturday, July 30, 2011

"Hains" Prusa Mendel RepRap: Finished!

Houston, we have plastic.

Last night was the night for finishing up the wiring and plugging it all in. With a small complication in late hour, and a fairly major soldering crime that followed, I was final able to put the finishing touches on the machine and turn it on. It is now finished.


In the video you will see me pitch the segment to the main camera twice, then, panic as the extruder starts smoking, consult the community chat room who say that's normal the first time, then finally get some gooey mess to come out of the extruder, which they say is also normal for a first time extrusion. Then I finally toast the occasion with a sip of single malt scotch.

Success!


- Posted using BlogPress from my iPad

Friday, July 29, 2011

"Hains" Prusa Mendel RepRap Update: Final Stages

Build Tasks
  1. build frame
  2. add y axis
  3. build x axis
  4. add x axis w/ z axis
  5. add top print plate
  6. build extruder
  7. make hot end
    1. make heat core
    2. make thermistor
    3. assemble hot end
  8. connect electronics
  9. install software
  10. test reprap
  11. calibrate reprap
  12. PRINT!
The hard parts are all done! The machine is essentially built. Not only that, but even though I haven't officially completed steps 9 and 10, I have skipped ahead a bit so I could figure out what I'm doing. I filmed the moment when I first got the motors to turn, which you can see on YouTube.


I got the netbook computer running. I'm using it right now to write this post. That was a major point of anxiety for me because I wasn't sure I could resurrect it and it's going to be the main interface for this machine until I get the SD card thing working. I'm relearning Linux and learning the new Ubuntu OS for the first time.

With the netbook working (which has a web cam built in) I've started live streaming the build. You can check out my UStream channel to see recordings of live parts of the build, and even maybe catch me live while I finish the build and start printing. I'm broadcasting all of the rest of the build and will keep it going while I print for a little while.


The software has also been sorted. Up until a few days ago I was still more or less in the dark about the software process, and frankly, it was the part I was most worried about. I hadn't seen much in the way of tutorial or video about the software, not even so much as someone to outline the process from electronic 3D model to printed plastic.

Here's what I wish I had known from the start, so I could be more confident about completing this project.

From Electronic File to Plastic: A Software Overview

Before you make your first print you need to first load the firmware onto the RepRap's motherboard. The application for that is Arduino IDE. It can be obtained through the Arduino web site.

There are three steps to making a plastic print on a RepRap.
  1. Create a 3D model. Produce an .stl file.
  2. Skein the .stl file. Produce a .gcode file.
  3. Load the .gcode file into the print host application and print.
Create a 3D Model

I recommend Google Sketchup. There are a series of helpful tutorials by Google that will help you get started. You'll need a plugin for Sketchup to export an .stl file.

Skein the .stl File

The model needs to be sliced into layers, and for each layer a tool path, the plot the extrusion head will follow, needs to be generated. This is called the skein. Skienforge is the program to use for this step. This application is also where you set up all the calibration information for the printer. Skeinforge can be picky about the .stl file, so you might need to run it through an automated repair service at netfabb.com.

Load the .gcode File Into Print Host

The application that actually talks to the electronics on the RepRap is called a print host. Use the application called Pronterface. With pronterface (usually not capitalized) you can manually control the printer too. So with pronterface connected you can move the print head around, which helps with configuration and testing. When you're ready to print, load the .gcode file and hit the print button.

All of this software is free. All of it is available for Windows, Mac. Only Google Sketchup is not available on Linux. I will be creating videos and screencasts of each step, as well as a summary overview, to make things easy for you. Stay tuned.

Friday, July 22, 2011

RepRap Milestone - Fame and XYZ

The "Hains" Prusa Mendel RepRap in progress.


Updates on this project have slowed, but it's been in favor of getting work done. But the project reached a significant milestone yesterday that deserved an update. The frame, X, Y, and Z axis and print platform are complete. This constitutes the main body of the machine and most of its mechanical parts. All that's left is to build and mount the extruder, then the electronics.

While I will go back and continue to blog the build process, step-by-step, I want to take this opportunity to give you a few highlights and insights from the work so far. The project has not been without challenges and opportunities for discovery. Filming has added an extra dimension, and I've realized that I tend to drift off in the middle of a sentence while I'm working, so I need to speak THEN do.

The quality of the printed parts matters a great deal, more than I would have thought. Last week I broke a coupler, the part that connects the 5mm motor shafts with the drive bars for the Z axis.


One coupler was well made, the other one wasn't. It's 5/16" end was too big, which made it necessary to route out material between the clamps, and by the time I got it to grip on the drive shaft it flexed too far for the plastic to take. 


I tried a few ideas for building new, DIY couplers. The IRC #reprap channel gave me the idea for the rubber tubing version. I made a couple wooden variations of couplers that are commercially available.


I couldn't machine the wood so that the drive shaft would align with the motor well enough to use, so I wound up going with the tubing.

Besides that, it was a big challenge to get the Y axis smooth rod to line up. That one almost broke me. I think that one was related to the quality of the parts as well, since it seems the variation in the width of the bar clamps affected the measurements for getting the bars parallel. In fact, the hardest parts of this build have been the parts that need a lot of fine adjustment, like the parallel Y axis smooth rod, the parallel Z axis smooth rod, and the level print platform. I was surprised by how much attention these processes would need and failed to appreciate how minute changes can dramatically affect the performance of the machine.

Fasteners have been a problem. It could be the parts list, my ability to shop, or the sales person at Fastenal not being able to understand me, but the parts I got were not universally the parts I needed. It will be fairly important to detail exactly what I got and what I should have bought in this blog, because I have had to cut some screws, use the wrong size screws, and otherwise make do in not just a few cases. Some parts remain completely unused.

But regardless, I've made it through and now I'm on the back nine and feeling good. The next steps are to build the mechanical part of the extruder, then the hot end, and then finally the electronics. Those few steps accomplished it will just be a matter of getting computers to talk to the machine to turn plastic filament into stuff.


Today I film the build of the extruder (the test run pictured above,) and I'll start the hot end. Since I've already given it a try to work out its issues, today's event should go off without a hitch. Tomorrow I'll try to finish the hot end and maybe start to set up the test of the electronics. If I get a test by tomorrow night (not likely) then next Wednesday I'll try to mount the electronics and start to dial it in. If that goes perfectly then I'll maybe try printing something next Thursday. If that happens I'll put up a UStream live video stream of the maiden voyage/calibration print. That's the soonest I could print something. I'll be going to GenCon the first week of August, so that's going to knock a week and a half long hole in my calendar and printing will most likely start the weekend of the 12th of August or the weekend after that. At least I have a decent estimate now, though.